How to Print Cloaks, Weapons and Creatures That Don’t Snap
Fragile weapons, flowing cloaks, and thin tails often break during or after printing. These parts demand specific slicer settings, orientations, and materials. If you want more durable fantasy miniatures without losing detail, understanding how to prepare delicate models for print is essential. Avoid wasted resin and broken pieces by printing smarter from the start.
Why Fantasy Miniatures with Cloaks and Thin Details Need Special Settings
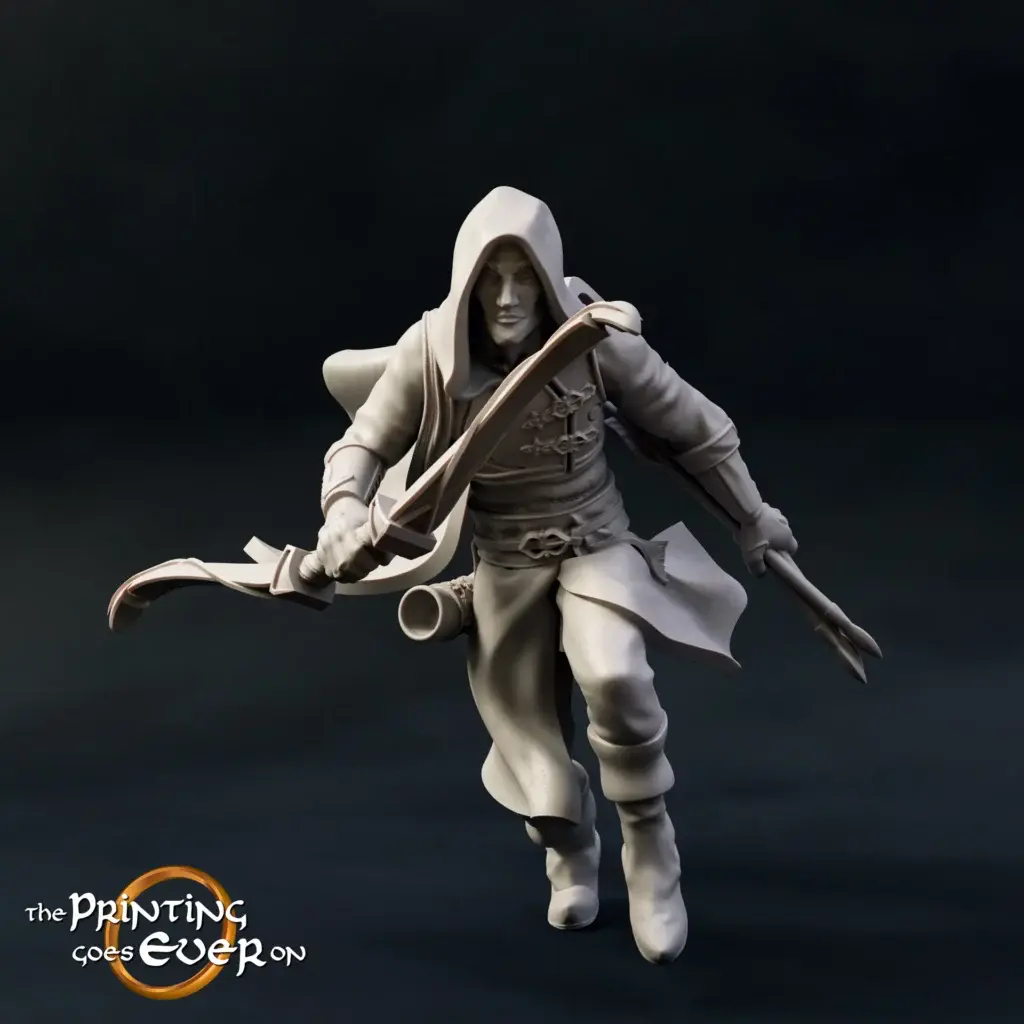
Fantasy heroes are rarely plain. Their stories unfold through every flowing cloak, glinting blade, and horned beast beside them. But those same features make printing them more difficult than most sci-fi or modern-themed figures. Delicate robes, extended limbs, and long weapons all present weak points.
If you’re working with fantasy STL characters with thin parts, you must approach them with extra care. These models often feature dynamic movement, such as leaping poses, windblown hair, or cloaks that arc away from the base. While these sculpts look incredible, every unsupported area introduces a risk.
This is where slicer settings and material knowledge become essential. Resin may capture detail down to the tiniest seam in a glove, but it also breaks easily if printed upright or overcured. In comparison, tougher filament options like PETG or Tough PLA offer more flexibility, especially for parts that protrude.
Minis with long tails or extended weapons are not forgiving. If the support settings are too thin or the orientation too vertical, one careless bump can snap the part clean off.
Printing smart from the beginning reduces frustration later. Choosing or modifying files that already include smart anchors for cloaks or swords means fewer tears when the curing station claims another victim.
If you want to keep the high-detail sculpts you love while still getting stronger miniatures for DnD, you need to treat each part like a potential stress point. Then print accordingly.
Tips for Printing Fragile Parts Like Swords, Tails, and Robes
You’ve chosen a warrior with a greatsword or a wyvern with a spiraled tail. You’re excited to print it. And yet, every time the blade or tail comes off mid-cleanup, you wonder if it’s worth it.
The good news is that it absolutely is. The trick lies in identifying the fragile elements early and preparing them with the right slicer adjustments.
For anyone working with 3D printing cloaks and weapons, here’s what truly matters:
- Review the slicer preview and find the thinnest zones. These are your weak spots. Look at where the sword connects to the hand, where the robe lifts off the back, or where a tail stretches out behind the model.
- Choose your supports carefully. Our products never rely on auto-generated supports — each model is manually supported by a professional for the best possible results. For delicate parts, light-touch supports are placed by hand in resin slicers to make removal easier and protect surface detail. On FDM printers, tree-style supports are manually optimized to reduce scarring and ensure a clean finish.
- Don’t skip wall thickness. This applies even more to FDM. Increase the wall line count to at least three for areas such as swords, spears, and limbs. This gives strength to thin objects without affecting detail too much.
- Reduce exposure time slightly if you’re working with standard resin. Overexposed layers make prints brittle. For delicate details like tails and flowing cloaks, less exposure means more flexibility during cleanup.
If your workflow includes sanding, go gently on fine parts. Swords and robes can be weakened further by aggressive post-processing.
Whether it’s a half-orc’s greatsword or a dragon’s barbed tail, these settings offer a reliable way to increase strength and stability while still printing fine details without snapping them later.
Best Orientation and Support Settings for Delicate RPG Models
Layer direction might seem like a technical detail, but it plays a huge role in the durability of your prints. If you’re wondering about the best orientation for printing weapons, it’s not straight up and down. That’s a common mistake that leaves blades and tails splitting along layer lines.
Instead, think like a sculptor. Look at the natural shape of the object. Swords, for instance, are strongest when printed flat or diagonally across the build plate. This way, the layers follow the length of the blade rather than slicing across it.
For thin part printing for fantasy minis, supports are your allies, not just cleanup chores. Strategic supports under robes or trailing tails prevent the part from curling or sagging. They also help distribute the weight more evenly throughout the print.
Supports for fantasy miniatures need to do more than hold things up. They need to protect your details without destroying them. This is especially important for flowing cloaks and hair that lift away from the body.
Here’s a practical example. A ranger’s cloak lifting behind him should not face directly upward. Tilt the model back 30 to 45 degrees. This helps spread stress across more layers, keeping the detail intact while lowering the risk of snapping.
The orientation is not only about what looks stable on the plate. It’s about understanding how pressure flows during the print and how the model will respond once it is removed from the supports. When your print durability for small RPG models depends on millimeter-thin connections, it pays to think ahead.
Small RPG Models: How to Increase Durability Without Losing Detail
Detail is what draws us to these models in the first place. But keeping that detail while building durability takes intentional planning.
The simplest way to reinforce fragile models is through adjustments to the slicer settings. For anyone learning how to print fragile miniatures without losing the artistry, the starting point is wall thickness. In both resin and filament prints, increasing outer walls helps form a strong structure.
Next comes material selection. PLA is common and affordable, but it’s also brittle. PLA Plus offers a better balance between ease and strength. If you need added flexibility for long swords or extended limbs, PETG or Tough PLA are better choices.
For resin users, not all formulas are created equal. Standard resins break easily under tension. Durable or ABS-like resins handle stress better and can still produce high detail.
Another strategy that works well is to print models slightly larger. Even a 10 percent increase in scale makes cloaks, swords, and tails noticeably thicker and stronger. The detail often improves too.
And don’t overlook internal structures. Using gradual infill settings or avoiding full solid zones prevents brittle spots from forming deep inside the print.
When working with preventing breakage in tabletop models, each setting builds on the next. Thicker walls, combined with better materials, equal stronger weapons. Smarter orientation, combined with careful support, equals less cleanup damage. Altogether, they create a miniature that survives a campaign instead of shattering during setup.
Avoiding Breakage When Printing Thin Parts in Resin
Resin printing gives you the kind of surface quality that painters dream about. But it also comes with a cost. Fragile elements, such as cloaks and tails, often suffer damage during removal, curing, or transport.
That’s why knowing how to avoid snapping resin miniatures is key for any adventurer who depends on detail and durability alike.
The first tip is to use the right resin. Many standard resins are too brittle for anything that extends far from the model’s center of mass. Choose a tougher formula. Even better, keep a separate bottle for miniatures with cloaks, wings, or weapons.
Next, think about your post-processing. Curing the resin for too long or at too high an intensity makes it more brittle. Follow the resin manufacturer’s curing guide closely. Rotate models during curing so all sides are evenly exposed.
Handling matters just as much as printing. Don’t use sharp tools to remove delicate supports near thin parts. Gently wiggle supports off instead of snapping them. Some hobbyists apply a thin layer of superglue or UV resin to the back of swords or tails after curing for added reinforcement.
This final layer acts like armor, making sure your cloaked rogue or mounted knight survives more than one session.
Knowing how to print cloaked figures and tails is more than just understanding slicer settings. It’s about the entire journey from plate to battlefield. That journey should not end with a broken blade.
STL File Considerations for Cloaked and Armed Characters
Before you even open your slicer, the STL file already determines much of your success. The design of the miniature shapes determines their strength.
When searching for fantasy STL characters with thin parts, choose models that use geometry in your favor. A good sculptor will add anchors where needed. For example, a cloak that touches the base or wraps around a leg provides extra strength. A sword held close to the body is less likely to snap than one stretched outward.
Here are three things to look for before printing:
- Does the model include cloaks or capes that rest on something solid? If the cloth flows in mid-air, it will need a lot of support and be prone to snapping.
- Are weapons connected in more than one place? Two connection points increase durability, especially during cleaning and painting.
- Are tails or long details shaped in a way that lets them rest against the model or base? This reduces wobbles and weak points.
You can also reinforce STL files by slightly thickening weapons or extending cloaks down to the base. Many slicing tools allow for minor scaling or remixing, which can make all the difference when trying to create stronger miniatures for DnD.
Starting with a smart model saves you time, resin, and frustration. It’s the foundation for any great print.