If you want to learn how to paint 3D miniatures, we have a simple guide that will help you master this skill in no time!
Our guide covers everything from paints, washes, brushes, colors, and primers to help you prime, paint, and perfect your 3D miniatures.
If you’re new to painting 3D printed figures, don’t worry, we’ve got you covered. In this blog post, we’ll provide you with step-by-step instructions, based on our experience, to help you avoid mistakes and paint your fantasy figures with ease.
So, let’s get started!
First Question: How hard is it to paint 3D printed figures?
If you’re new to the field of painting 3D figures, don’t worry, you’re not alone. We’ve all been there before. To avoid making mistakes, it’s helpful to get some know-how from people who have made a lot of mistakes already, so you can avoid them. Mistakes I mean. Not necessarily people.
Anyway, in this note, we’ll guide you step-by-step on how to paint your fantasy minis based on our experience. We’ve tested our methods on figures, and while we did lose a few, we were able to print out new ones. So, don’t worry, we can get through this together.
Let’s get started!
Table of Contents:
1. What equipment do you need for 3D miniature painting?
2. What do you need to do before painting?
3. Quick Tip: What is the best (and the easiest) way to paint a 3D model?
4. Quick Tip: What paint to use for 3D painting?
5. Quick Tip: Do you need to sand 3D prints before painting?
6. Tutorial: How to paint your figurines?
7. Final stage: details, errors, dry brushing
THE GATHERING PHASE: What to collect before painting
As the Printing Goes Ever On team used to say: you must gather your party before venturing forth. In this case, before you start 3d minis painting, you need to gather:
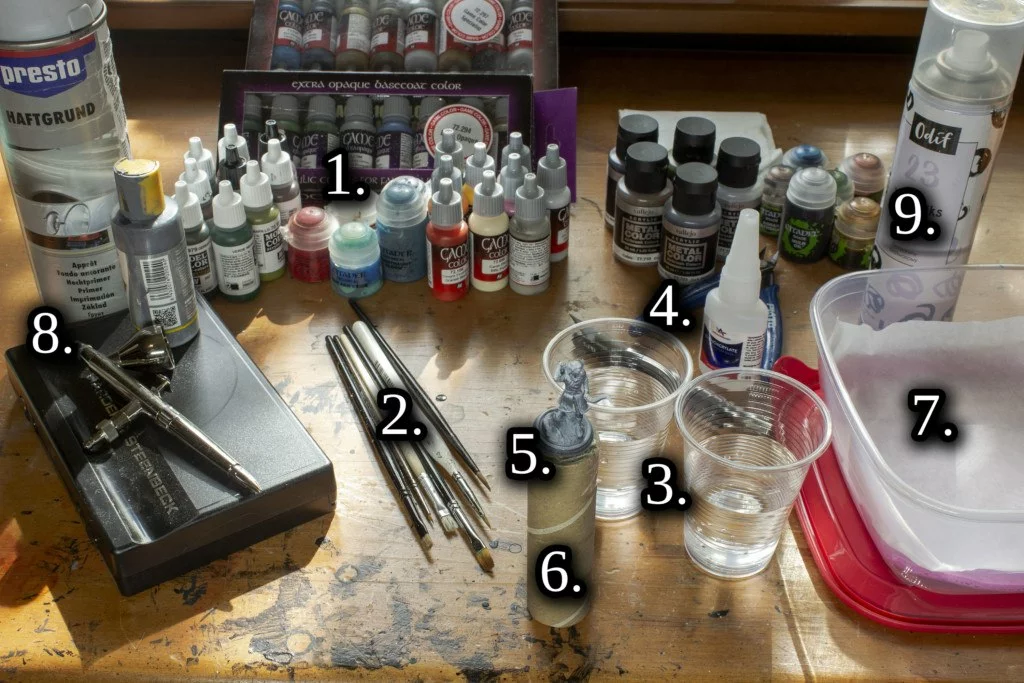
1. Paints and washes.
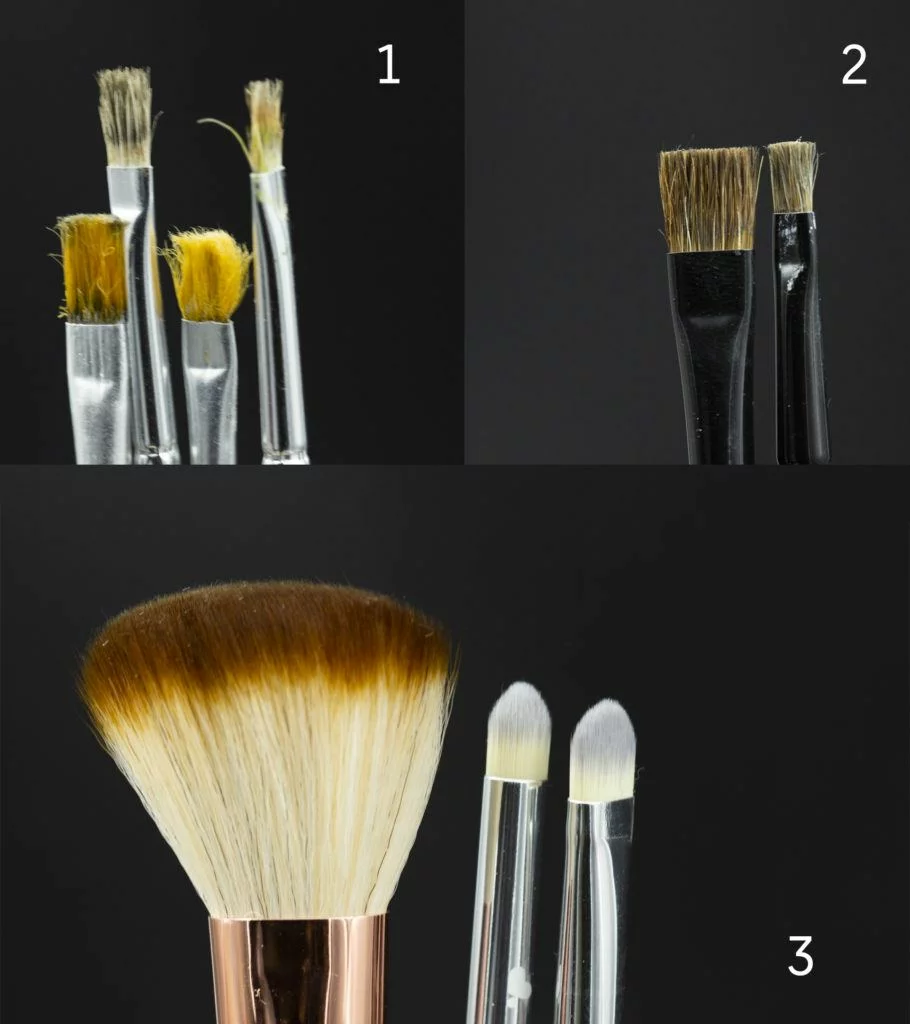
2. Brushes – at least three of them: a regular synthetic brush, a dry brush, and a fine, expensive brush. Their size and thickness depend on the size of your figures. In the case of our Patreon minis (LINK), we use 0, 1, and 2 brush sizes.
3. Two cups of water – you may use the first for cleaning off brushes from metallic colors and the second for the others. Or, if you prefer, you can divide them into a cup with clean and dirty water. As you see fit. Anyway, though, two cups is a minimum.
4. Clippers or knife (you don’t need them painting our 3d minis though as our figures will arrive set with removable supports – you can watch a video on how easily you can get rid of them).
5. Something to stabilize your miniatures – double-sided tape, superglue, or removable putty will do the trick.
6. Wooden or dedicated handle – to stabilize your figures and to grab them comfortably.
7. Wet pad – to prepare one, you need a small, plastic container. Put some paper towels into it and then pour some water to moisturize them. It’s very useful if you don’t have several spare hours in a row for figures painting. You’ll provide a longer life to your paints when you put them into it. Your mixed colors will remain fresh and ready to use inside this box. Alternatively, you may prepare a water pad with a wet sponge and a raw (unwaxed, not silicone-coated) parchment putting on it.
8. Spray primer or airbrush.
9. Varnish (if you like).
THE PREPARATION PHASE: What you need to do before you paint your minis
1. Plan your colors – Before painting, visualize how your figures will look in terms of colors. Consider the colors of their clothing and skin tone and plan out the colors you want to use beforehand. You can even create a list of colors to ensure that you don’t miss anything.
2. Mixing colors – While painting, keep in mind that you can mix colors on your wet pad. If you make any mistakes or create colors that you’re not happy with, you can always discard them and replace the old wet paper towels with fresh ones. Make sure to take note of the ratios you use when mixing colors.
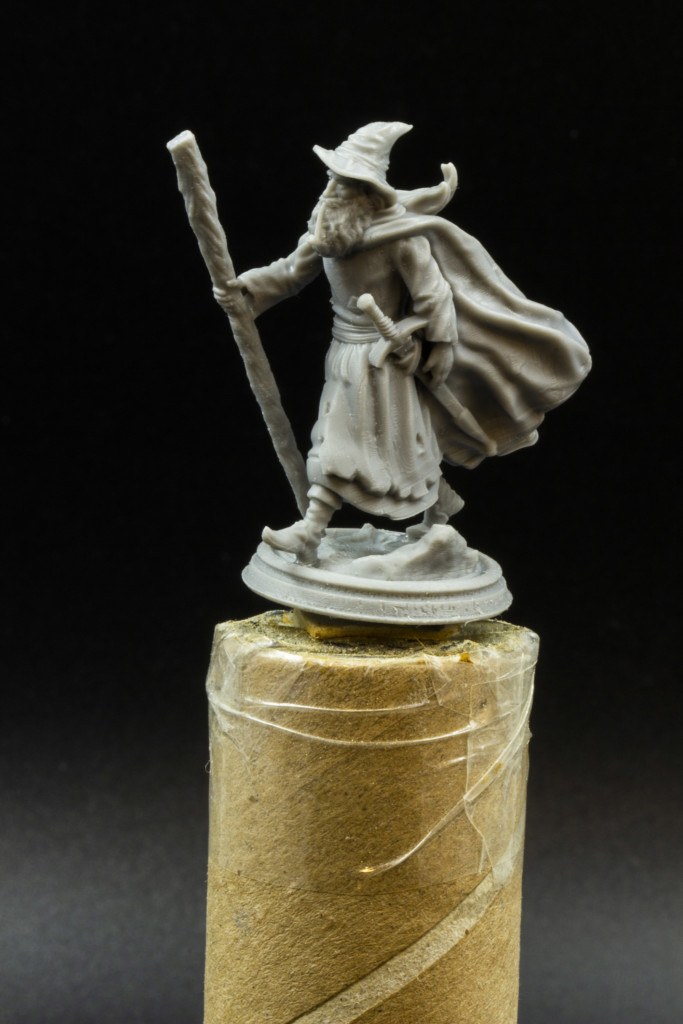
3. Stabilize your figures – To make painting easier and prevent smudges, use handles to stabilize your figures. Use them wisely! Glue your 3D figures to the removable putty or just stick them to the double-sided tape placed on the handle.
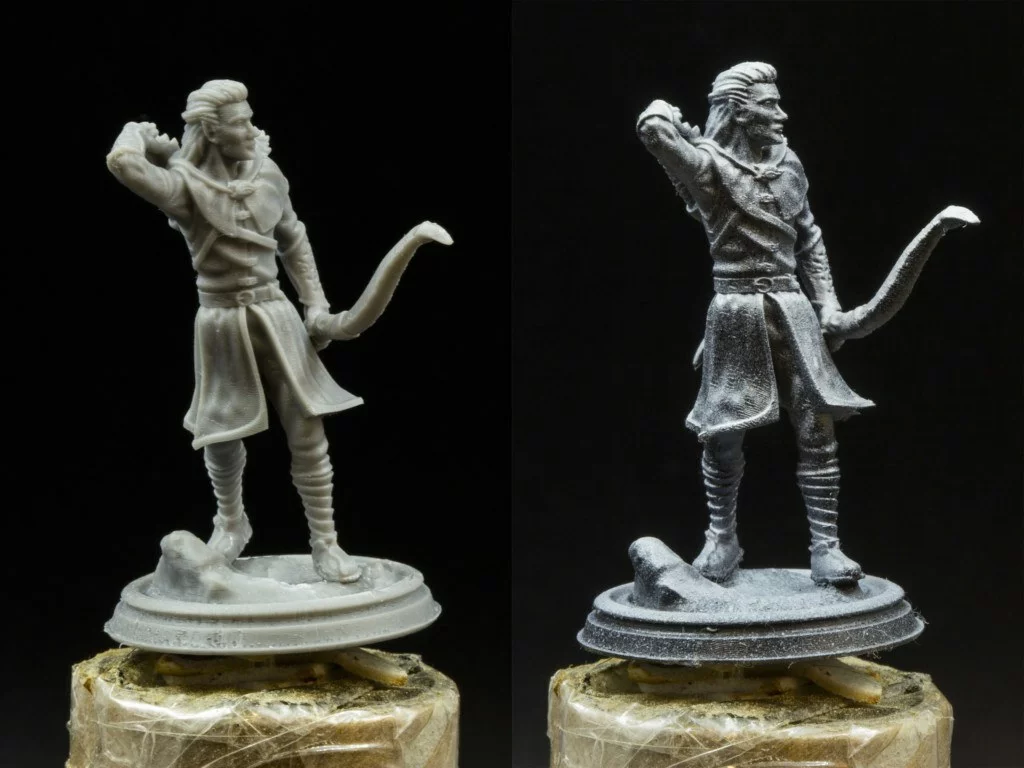
4. Use primers – There are several ways to use primers on your 3D miniatures. There are several ways to use primers. Beginners often start by spraying their figures with a pitch-black primer. This allows for leaving some spots uncovered and still looking good as they resemble shades. However, the too-dark primer (and black is undoubtedly so) will affect the paint colors on it. It is advised to start with the gray mid-tone primer.
Keep in mind that a few light coats of primer on your minis are better than one thick layer. If you prefer a bear to a squirrel, then zenithal highlighting may be a good choice. Use two different colored primers and prepare to spray them at your 3D figures. The primers must be in neutral colors – the best will be two different shades of gray. Start with the darker gray on the base and finish it with the lighter gray on the top. Thanks to this trick, you’ll get a fake light effect, and all the details on the 3D figure will be more visible and accessible. If you have an airbrush, be sure to use it in this step, and remember to shake the spray properly beforehand!
Quick Tip: What is the best (and the easiest) way to paint a 3D model?
It is important to use a primer when you want your object to have a nearly perfect look. Paint alone may not be enough to cover all the imperfections or flaws. The best method for painting your 3D printed minis is to use a spray-on primer. It provides a uniform coating over the surface efficiently. Brush-on primers are also an option, but they can be difficult to handle and are more suitable for delicate touch-ups.
Quick Tip: What paint to use for 3D painting?
When it comes to painting 3D prints, acrylic paints are a popular choice due to their fast drying time and versatility. However, depending on your personal preferences, you can also consider using watercolor paints, oil paints, or other types. It’s worth noting that using paints specifically designed for plastics tends to produce the best results when painting 3D printed parts.
Quick Tip: Do you need to sand 3D prints before painting?
When preparing to paint a 3D-printed object, it is important to remove any supports and smooth out the surface with sandpaper. Priming is also necessary to create a sealed and even surface, which helps the paint adhere better to the plastic material. Sanding can help reduce the appearance of layer lines by smoothing out the raised areas. Another method involves filling in the crevices using a primer spray and sanding down the excess primer to achieve a smoother surface.
IT’S GOING DOWN: How to paint your figures
1. Choose Colors – Let’s start by discussing the colors. When choosing a color set, it’s best to go for a few colors, or even just one, that are specific to a particular character. To avoid a patchwork look, use the same color base for most of the miniatures of the same kind, and add a few differently colored details to them. This approach is especially helpful if you want to unify a regiment.
2. Apply the Coat – Before you start painting, keep in mind that you’ll need to apply at least two coats of paint to every spot on the figure. Start by diluting your paint, then apply two coats to get a smooth layer. It’s useful to know which color is best as the base color for a particular miniature. For example, brown looks best underneath gold, while black looks best underneath silver. Keep in mind that each color has different characteristics. Yellow colors are almost always highly transparent, while blue ones tend to provide excellent coverage.
3. Start Painting – Now that you’ve planned and prepared your colors, it’s time to start painting. You’ll notice more and more details emerging as you paint your fantasy miniatures, as well as some errors. Don’t worry, you can fix them later. You can apply the next coat as soon as the previous one is dry.
4. Add Washes – Let’s move on to adding some washes. Washes are very thin paints that fill in all the deeper, inaccessible spots, making miniatures look more realistic. In regular painting, you’d have to create all these shadows yourself. With printed 3D figures, you only need to delicately emphasize the existing spots. It’s very easy, satisfying, and makes the Franken-mini-steins come to life!
Before applying the wash, keep in mind that this type of paint is so thin that it runs down the figure, filling all the nooks and crannies it encounters. Be careful not to leave any puddles. Washes dry at different times depending on their brand and type.
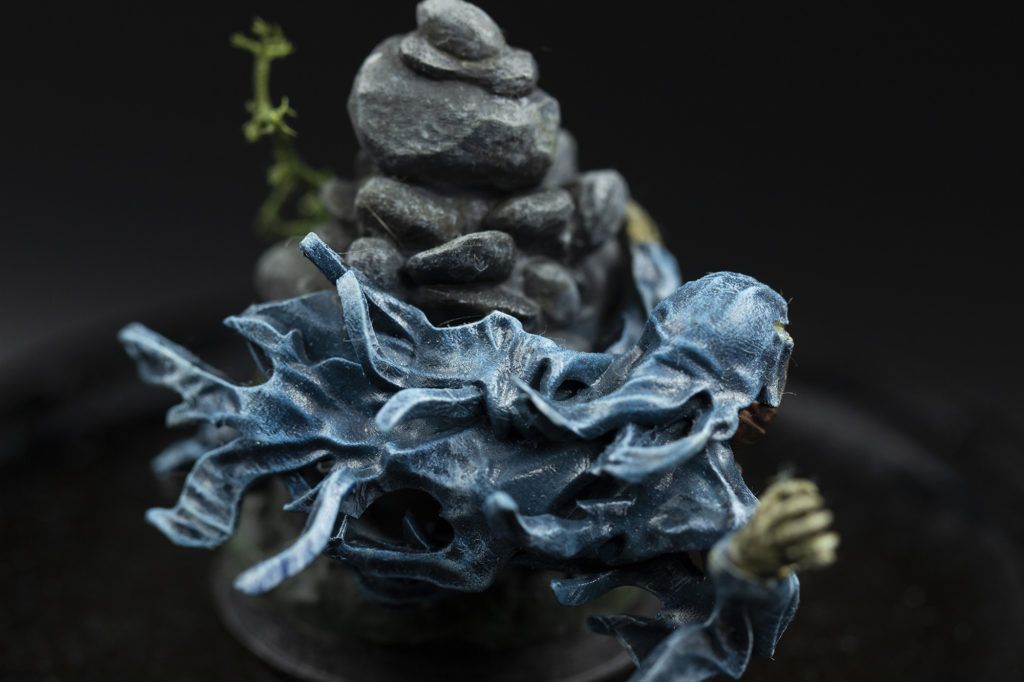
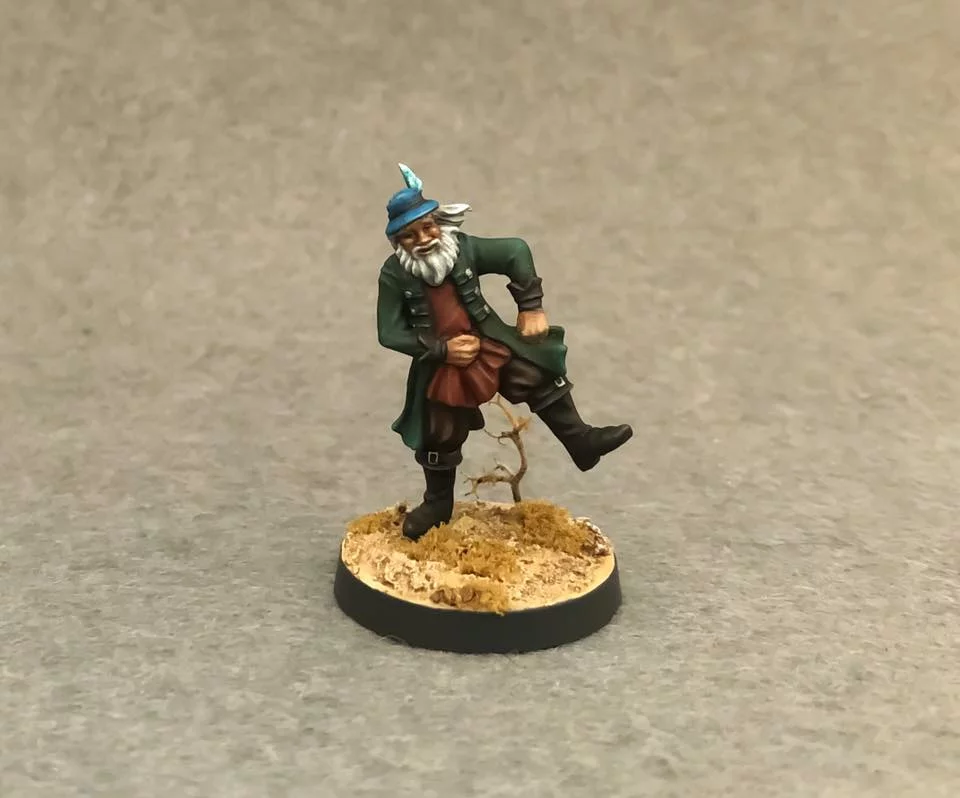
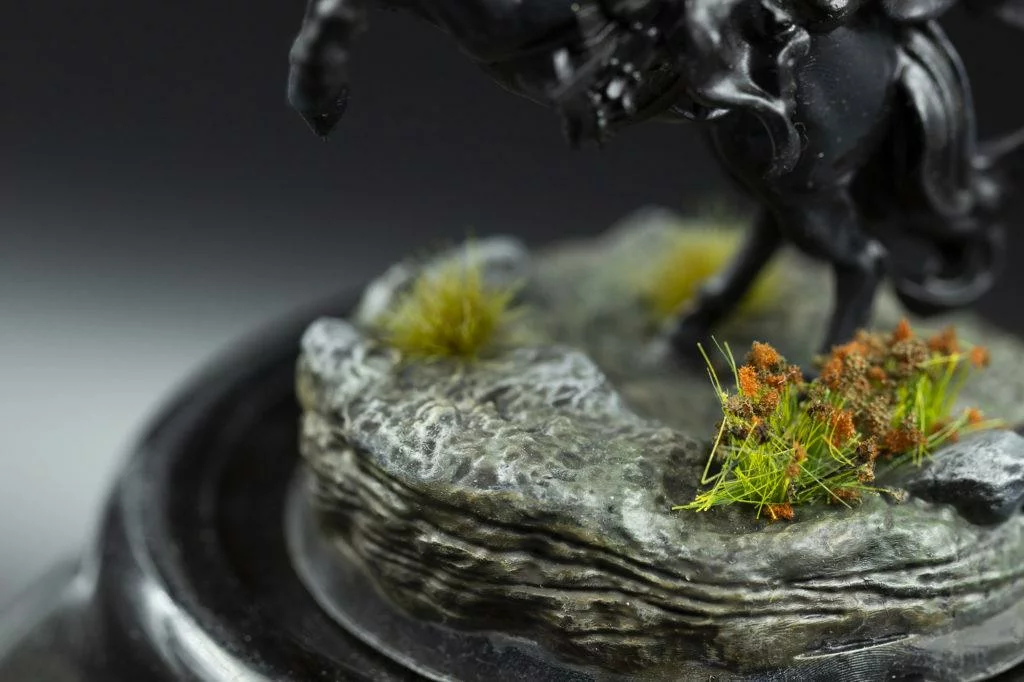
5. Paint Bases – Remember to paint separate bases. You must choose whether to create your own base or use the one provided. Creating your own base can be very fulfilling. You can use texture paste, stones, moss, grass, tufts, or flocking to customize them. Here’s an example of a base made by one of our Patrons:
6. Think About the Background – Now, it’s time to focus on giving your minis a unique character. Are your orcs living in swampy and gloomy terrain? Or are they elves who dwell in an enchanted forest? Whatever the case may be, make sure your base reflects their environment! Remember, the base is a crucial element of the entire picture. Consider which colors would complement the background of your bases.
THE FINAL STAGE: A few words about details, errors, and drybrushing
After painting the larger sections of your 3D figures, it’s time to focus on the details. Adding small details can significantly improve the appearance of your miniatures. This is also a good opportunity to fix any previous errors.
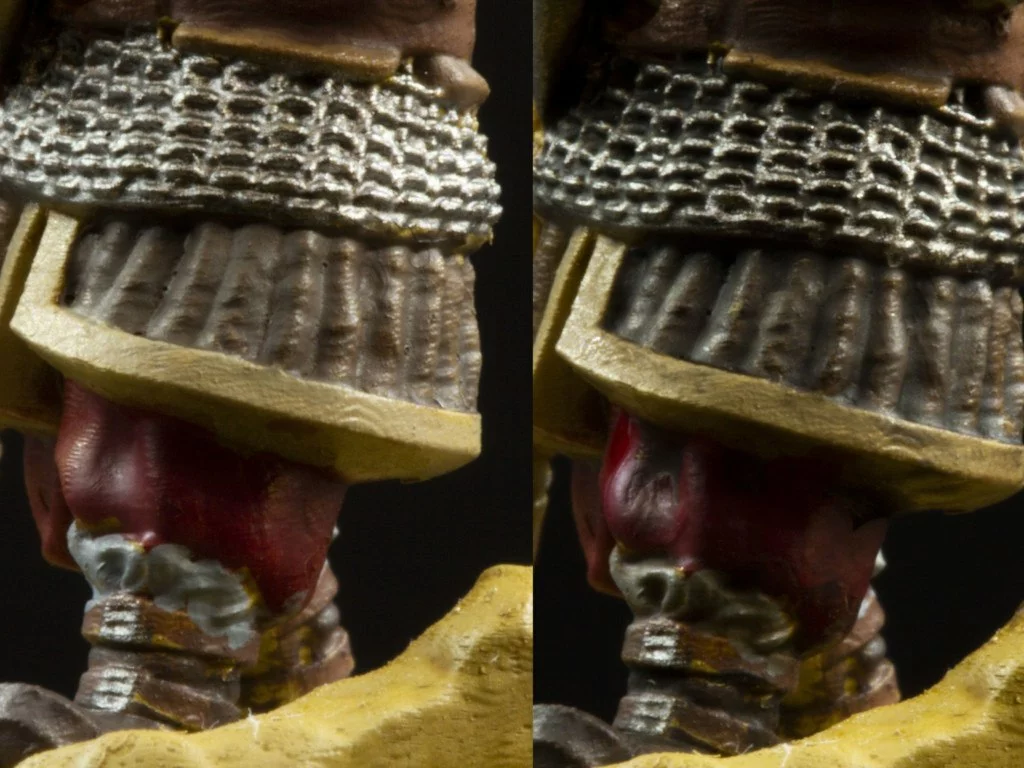
1. Painting Metallic Details – When painting metallic details, use the dry brush technique to avoid staining your carefully painted details. If you need an introduction to the dry brush technique, we recommend checking out our guide. Once you have painted the bottom layer, use the dry brush with any metallic color to scratch the paint subtly throughout the painted detail.
2. Highlighting a 3D Figurine – Finally, it’s time to highlight the miniature. Brighter colors will be more visible on the washed 3D figures. To create a good color for highlighting, mix white, vanilla, or yellow with the base color.
3. Painting Small Details – When creating 3D figures, you have the freedom to customize their appearance by painting their eyebrows, adding color to their eyes, or even giving them tattoos, scars, or rainbow pedicures… In short – you can make them unique the way you want. Drawing the eyes can be challenging, so take your time and consider the direction your character will be looking in. Using a thin paintbrush, firmly rest your elbows and focus on covering the eye socket, iris oval, and pupil circle. Alternatively, you can paint the entire eye white and add a black dot to simplify the process.
4. The Varnish Cover – The last step, which is not essential, is to cover your painted 3D miniatures with varnish. Some people do not like the final effect because colors and details may look different after varnishing. However, if you plan to use your 3D figures for gaming purposes, you should factor in varnishing because it is highly possible that some colors on your minis will chip or wipe over time.
It is recommended to use a varnish of the same brand as most of your paints. If you have mostly used Vallejo paints, then use their varnish. It is important to double-check and make a test to ensure that the paint looks good with your varnish.
Congratulations! You have just painted your 3D miniature!
And now, your finished, painted 3D figures are ready! Don’t worry if your miniature does not look perfect after your first painting attempt. Practice makes perfect, so do not give up and keep going! Also, if you are interested in starting your painting journey or obtaining some 3D printable figures to paint, check out our The Printing Goes Ever On Patreon site!
If you’re going to elevate your minis painting to a completely different level – you couldn’t click better! From this guide, you’ll get to know how to dry brush your miniatures step by step, what items you need to take off, and when you best benefit from it. Dry brushing is one of the highlighting techniques which allows you to bring out detail on a 3d miniature. Unlike fluid washes which make hidden, darker spots even darker (you can find out about them from our Minis Painting Guide), the dry brushing technique reverses this process, hitting only raised areas and making them look highlighted. One of them is fluid and the other is dry, and that’s what makes a difference.
To apply the dry brush technique you’ll need:
1.A brush – in our Guide we pointed out that you need to prepare a dry brush before you start painting your minis. However, it doesn’t mean it has to be a fancy and expensive brush. It’d be even better to use any old, grungy, balding brush for this purpose. You may keep the brushes that are damaged and hold on to them. It becomes your dry brushes eventually. One day later, when you become a master of painting, you’ll put into play specific dry brushes. You don’t have to buy them meanwhile.
2. A bit of unwatered paint – Precisely that – unwatered. Which is why it’s not a good idea to add them to your wet pad. You want paints as dry as they can be. Ideally, just put them on any unmoisturized material.
3. Some pieces of toilet paper, tissues, or paper towels. Anything paper honestly.
When best to use dry brushing and what to do before you start
1. Colors – in most situations, you’ll use a little bit lighter color than the one you used to the previous layer. However, sometimes it’s better to use a strong, different color if you want to get a more distinct contrast. On the other hand, drybrushing is not only about the highlighting. You may use it to apply a regular color, like in metal elements. It all depends on your plan for your printed 3d minis.
2. Drybrushing is good for painting rocks, metal elements, bricks, werewolves fur, or princely muss hair. Especially useful painting your bases as it is often filled whether with boards, raw ground, or greenery. Basically, if you’re up to revealing some varied textured parts on your 3d miniatures – grab your dry brush!
Drybrushing step by step
1. Prepare a paper towel.
2.The bottom line here is to take some paint on your brush and wipe as much of it as you can with a paper towel. As the paper is usually white, be careful wiping the white color because it’s difficult to notice how much of the paint left. When in doubt – dare to doublecheck wiping brush against your hand!
3. Keep in mind: less is more! In drybrushing, it’s easier to paint with too little paint on a brush than too much.
4. When there’s almost no paint left on the brush, you can take your 3d figure and start moving your brush just as you need, depending on what effect you want to get. Firstly, you may move it back and forth. That’s how you can reach both sides of the raised miniatures elements. Remember though, brush strokes need to be gentle, especially if you don’t plan to cover the whole element.
Secondly, if you like to experiment, you may use your brush in only one direction. The reason behind it is it looks more like light falling on your figurine from above.
5. It’s worth to mention the overbrushing technique, as it’s quite similar to this in question. The only difference is that the brush can be damp at the time. Usually, it’s about putting a little more paint on it than in drybrushing. The devil is in the details! And the latter can thus become highlighted more clearly without risking the paint float.
6. Here the drybrushing ends, but the painting process goes (ever) on! You can move on to the next steps such as washing or adding some other details.
As you can see, the dry brushing technique is super easy to apply to your miniatures. Basically, it’s about drying and painting. Although, it takes some effort to plan your colors and practice covering. Over time you’ll get good at it. Osgiliath was not built in a day! You may gain some practice on our excellent detailed 3d miniatures. If you seek inspiration, you can check out some examples of our painted figurines below. Good luck!